Now that you've explored the east side of the Resident Evil 2 Police Station and obtained the Lion Medallion, it's time to track down the second medallion. Interact with the sealed box on the west side of the main hall to cut the yellow ribbon with your combat knife. Enter the room and collect x11 Pistol Ammo and Green Herb. We leave through the door in the southwest corner of the room.
Hallway
Follow the corridor down to the operating room. There are things to interact with. You can also board up a window that prevents zombies from getting in from the outside.
Operating room
Turn left as soon as you enter to get pistol ammo x7. Read the document recording the events on the table. Take the map of Police Station 1F from the chalkboard. Climb up the boxes with yellow tape in the corner of the room to reach the next area.
Hallway
Turn around as soon as you land and collect Pistol Ammo x5 from the corpse at the end of the corridor. Ignore the zombies you see here and enter the next room.
Security room
When you enter the storage room, the zombies in the hall will begin to sneak through the door that you closed behind you. Go to the far end of the room and face the door. This is a great and safe place to shoot them in the head. At the front of the room, you will see a locker terminal. Two keys are missing, which means you cannot open any of the lockers (yet). Read the vault terminal memo on the table next to the terminal. At the far end of the room, you will see a weapon locker that you need to open with a key. Return to the corridor.
Western office

Both zombies are pretending to be dead here. They will come to life as you explore the room, or you can be active and start shooting first.
There are several points to collect here:
1. Gunpowder at the end of a long row of tables, right in front of the entrance
2. Uses gunpowder, note next to gunpowder
3. Pistol Ammo x3 in the locker along the west wall
4. Report on the operation on Elliot Edward's desk
5. First recruit's assignment, pay attention to Leon registration
6. Mr. Raccoon is a toy on the top shelf along the north wall of the West Office, sitting among cardboard boxes.
There is a safe in the southwest corner, but you don't have a combination yet. In fact, you won't get the combination for quite some time when you visit a room called STARS Office.
Leon's board puzzle
Newbie's first assignment on Leon's desk tells you to enter the first initials of all your fellow officers to open the locks on the desk. Run along the tables and look at all the signs to find the answer.

Enter NED on the left lock and MRG on the right. Open the table to get the Speed Loader (SLS 60). Combine this with a weapon to double your reload speed.
Photolaboratory
Return to the hallway and follow it north, turning right in front of the stairs. Take the green grass and wood planks in the hallway. (And you could also use the boards on the next window.) Enter the dark room where you will find a typewriter, a box of items, and in the back is a film developing sink (which you haven't found yet).
Collect the following items:
1. Gunpowder from the locker
2. Pistol cartridges X4 from the locker
3. The medicinal benefits of herbs are noted near the typewriter.
4. Red grass in the room with the sink. (Combine this with the green herb you found to create an element that restores all of your health, like a first aid spray.)
Upstairs hallway (2f)
Go upstairs and kill the zombie shuffling up the stairs from the floor above you. Collect Pistol Ammo x5 on the policeman's corpse at the east end of the corridor and the red grass at the vending machine at the west end of the corridor.
Dressing room
Enter the dressing room. To your left is an endless stream of steam that prevents you from moving on, and a valve that controls the steam. Now there is nothing you can do about it.

Take the portable safe (and read the instruction manual for the portable safe nearby) in the southeast corner of the room. Examine it in your inventory to solve a puzzle. Unfortunately, the solution is randomly generated in every game.
Your goal is to light the green light bulbs in order, one next to the other. This will probably help you write down the solution when you understand it. We like to start with the first button in the first column, which we've labeled 1-1 below. This is how it might look in your game:
1-1
2-3
2-1
1-2
2-2
1-3
2-4
1-4
Solve it and you will receive a replacement part (key item). Examine him in your inventory and you will find out his real name: a spare key. It fits into the security of the terminal deposit for the room. Before you go, open the lockers to find flame rounds x2. (This is for a weapon you don't already have.) A dial lock prevents you from opening one of the lockers here. You won't find the combination until you get to the operating room much later. (And inside, you will find flames of rounds x2.)
Security room
Return downstairs to the security room. Place the spare key in the 2 slots of the storage locker terminal, allowing you to collect more things right now.

Enter the following codes to open lockers:
102 for gunpowder
106 for roll film that becomes film: "commemorative" when you examine it in your inventory.
109 for cartridges for pistol X9.
Photolaboratory
Return to the dark room and place the movie: "Memo" item in the dark room sink. This gives you a commemorative photo that is the key to the upcoming puzzle.
Hallway (3f)
Return to the hallway and go up the stairs to the third floor. Collect pistol ammo x8 on the crate to your left. There is another locker at the end of the corridor, locked. You will get this later. Enter the next room and take the key on the table. Exit the room and enter the hallway. Follow the corridor down to the dead end. Match to any live note. Enter West Storage Room.
Western warehouse

Collect gunpowder and wood planks in the area immediately after entering. Walk to the other end of the room and grab the Ammo x8 pistol from the shelf along the west wall. You can interact with the explosive barricade here, but you cannot do anything with it. Check the table next to the barricade for some guy's scribble note and a hip bag to increase your inventory by two slots. Exit through the east door to enter the library.
Library
You will receive a call from Marvin when you start exploring the paths above the library. If you cross and turn left, you will fall through the floor. Do not do this. Instead, turn right and head towards the stairs. Remove the zombies in the room one by one. Remember to use your combat knife after they fall to make sure they are dead. Collect the new combat knife from the policeman's corpse in the southwest corner of the room at the bottom of the stairs. At the door with the sign "Exit", a large zombie depicts a dead man.
He needs more rounds to pack. And he can get up more than once, so be prepared. Collect the Red Book on the table near the shovel door on the east side of the room. On the west side of the first floor of the library, a zombie is eating a zombie. There is also a jack, with which you can't do anything now. Move the bookshelves to the left of the nesting bookshelf to the right. Return to the space you created to find Pistol Ammo x12.We leave the library through the door at the bottom of the stairs.
Living room (unicorn statue)
Collect the map of the upper floors of the police station on the wall opposite the door you entered. Collect gunpowder on the small table by the west wall.

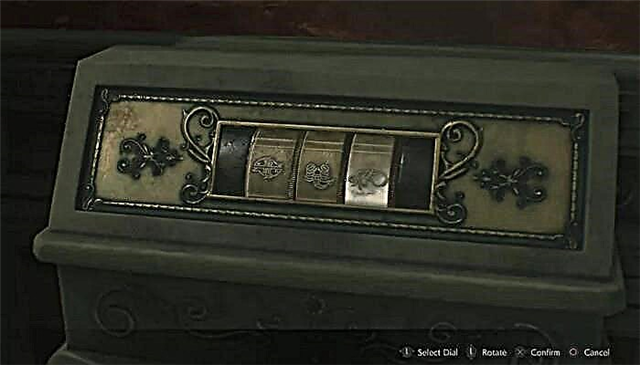
Turn the dials on the unicorn statue using the Officer's Notepad to enter the correct characters: fish / scorpion / water jug. Do this and you will receive a unicorn medallion. There is another door, but it is locked.
Library
Return to the library. Exit through the shovel door.
Main corridor
Go downstairs and watch the video with Marvin. You will see Leon and Marvin will tell you that the second floor of the East Side will lead you to Leon. Insert the unicorn medallion into the goddess statue. Before going there, you can use the shovel key to open the door from the main hall to the West Office. (This is the room where you solved Leon's puzzle. It's just a shortcut.) Two medallions are omitted, only one remains.