A walkthrough to help you find all the skulls and terminals in Halo: The Master Chief Collection. Well, here it is again! Combat Evolved has just arrived on PC and I'm sure.
What you need is a quick and easy guide to help you grab all those skulls (and terminals, don't forget them). There is at least one collectible in every level, so keep an eye out for it and follow this guide closely so you don't miss them. If you do, just return to the mission later.
As each part of the Master Chief collection arrives, I will post separate Guides for each. And when they all appear, I will publish a Mega Guide with all the titles collected in one place for easy access.
The Pillar of Autumn
Skull #1: Iron
Effect: Death in co-op resets you to the last saved checkpoint. Dying solo restarts the level.
Location: At the beginning of the Pillar of Autumn mission, after leaving the cryo tank, go to the back of the room with purple containers. The skull is right behind them.

Terminal #1
Location: Just when you enter the bridge to talk to the Keys. Turn left and the glowing red booth is a terminal that can be found very easily. You can also get this after talking to him.

Halo
Skull #2: Mythic
Effect: All AI Covenants have twice the health. All Guardians have energy shields.
Location: Once you land on Halo, head towards the waterfall in the distance. Look to your right and you should see a skull on the ground.

Skull #3: Mythic
Effect: Explosions have double damage radius.
Location: After the warthog fell after defending the Forerunner structure, continue on before going into the underground trench instead at the edge of the cliff on the right side up the ledge and it will be right there.

Terminal #2
After the first serious fight, the pelician will abandon the warthog. Drive it into the tunnel and you will notice two holes here. One has a ramp that goes up and one that goes down. Choose the one that goes down, then turn left. There is a hallway here that glows yellow, with a terminal.

The Truth and Reconciliation
Skull #4: Foreign
Effect: Players will no longer be able to collect Covenant weapons.
Location: On the bottom floor of the hangar, in the hallway where the hunters ambush the marines.

Terminal #3
Location: The terminal in this mission is located on the main platform of the ship's bridge. Approach the holographic panels and click to get a video and completion stats.

The Silent Cartographer
Skull #5: Famine
Effect: Weapons thrown by the AI - ally or enemy - will have half their ammo as normal.
Location: After exiting the Pelican, immediately turn around and head in the other direction. You will come across a large part of the island with a ramp going up. Climb up and you should find a skull waiting at the end.

Skull #6: Bandana
Effect: Players will have unlimited ammo and grenades, but will still have to reload them.
Location: Go into the security console building and go into the tunnel leading to the console. Enter the open room, grab a grenade, and then perform a grenade jump on top of the structure to find a skull. Make sure you are at full health or you will die.

Terminal #4
Location: When you fight the first pair of Hunters in this mission, a large structure has a terminal under one of the offshoots from the corridors.

Assault on the Control Room
Skull #7: Fog
Effect: The player's movement tracker will be disabled
Location: After crossing the first bridge and taking the elevator to the first floor, the skull will be on a raised platform in the center of this room and surrounded by fog. This will require a jump with a grenade.

Skull #8: Malfunction
Effect: When activated, one random part of the Heads-up display disappears after each respawn. [Not cumulative]
Location: As you enter the tunnel and enter a large room with a gorge, you will notice pipes that stick out of the gorge in the middle on both sides. The skull is on one of the pipes sticking out of the walls of the gorge.

Terminal #5
Location: Towards the end of the level, you will come across a pyramid-shaped structure. Head towards the structure and you will be able to see a crack here with a yellow glow. The terminal is in this crack.

343 Guilty Spark
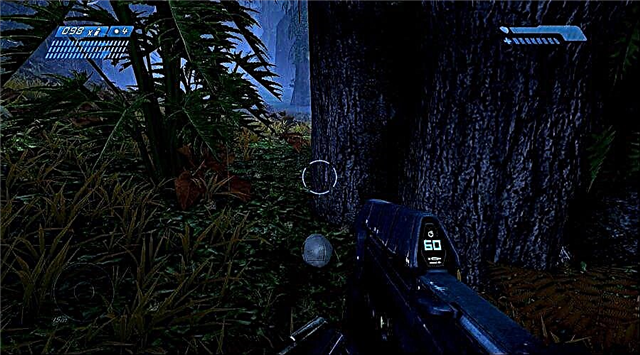
Skull #9: Recession
Effect: Each shot the player fires drains two rounds instead of one. For plasma-based weapons, the depletion rate is doubled.
Location: Located to the left of the object in a small blob behind the shadow of the tower. As you cross the fallen tree, you will see an exploding turret and assault rifle fire. Instead of going inside, immediately go left and stay against the back wall. You will come to a tower with a small drop behind it. Gently slide the drop down and the skull will be waiting for you below.

Terminal #6
Location: At the end of the level, enter the elevator that will take you back to the surface, activate the elevator and quickly turn around. You will need to jump as the elevator goes up to access another level on the elevator to land on the overhang where the terminal can be accessed.

The Library
Skull #10: Black Eye
Effect: When activated, the only ways players can recharge their energy shields after taking damage is through enemy combat or using a medkit.
Location: At the back of one of the vents before entering the index chamber for the first time. (Warning: grenade jump required.) On the ground floor at the start of the level, you'll notice square holes in the ceiling that the flood uses to enter the level. Before you enter the round yellow room, find the vent closest to this door and jump through it. The skull will be waiting for you.

Skull #11: Eye Patch
Effect: Auto-aim will be disabled.
Location: behind the sign on the final platform. Instead of running to the platform to grab the Index, go around it while staying as far away from the Index as possible. The skull will be waiting on the ground right behind it.

Terminal #7
Location: Reach the third floor of the Library, when you enter the circular room, look ahead and see a glowing yellow light. Walk to the right and jump over the base of the support structures. After several obstacles, you will find yourself in a room with a terminal.

Two Betrayals
Skull #12: Piñata
Effect: Enemy infantry will drop a plasma grenade with every melee.
Location: After you've captured the last Banshee, fly past the third generator room back to where you exited the chasm tunnel. Search the top of the underground entrance.

Terminal #8
Location: Once the cutscene at the beginning of the level ends, go left and circle around until you reach a glowing terminal.

keyes
[No skulls]
Terminal #9
Location: Go to the room where the remains of Captain Case are kept. When you enter this room, look to the right to see the terminal.

The Maw
Skull #13: Grunt Birthday Party
Effect: Unggoy will explode in the confetti shower with a headshot.
Location: After the last fight of the Foehammer, use the Warthog to stand on one of the railings where the Foehammer falls at the end of the mission.

Terminal #10
Go through the cryogenics storage room in The Maw and use the stairs to get to the control room. Check the walls of this control room for a glowing red terminal.