Tomb Raider: Anniversary's text-based walkthrough reprises Lara Croft's original genre-defining adventure, a third-person itinerant adventure in pursuit of the legendary Scion artifact.
Using the improved game engine of Tomb Raider: Legend, graphics, technology and physics bring the adventure of Lara and the pursuit of a mystical artifact known only as Scion to modern technological standards and offer players a completely new gameplay experience. The reimagined Anniversary game features dynamic, fluid and fast Lara Croft, expansive environments with stunning visuals, intense combat and game pacing, and an improved and clarified original story.
Full text walkthrough of Tomb Raider: Anniversary with all the secrets. Added for easier access while playing via Steam Overlay.
1. Peru - Mountain Caves
After the introductory video, you will find yourself in a snow-covered valley, there is a cave nearby, which you need to get into. Run forward, jump onto the ledge, climb to the right, after a couple of turns, jump over to the opposite side, jump over a small gap and climb up the rise. Next, there will be two ledges located one above the other, jump up on them, run up and jump off the cliff, swing with the help of the cat and get to the opposite side. We go to the right along the steps and you will see a gate that you need to enter, but in order to open it, you will need to press the button located above the entrance. On the left side of the gate, jump onto the hill, jump over the abyss with the help of a cat. On the left you will see a ledge, grab onto it, move to the left and jump over to the higher ledge, then jump to the left and press the button that opens the gate. After the video, you will find yourself in a cave, run forward, there will be a stone slab, stepping on which you will activate a hidden mechanism and then arrows will fly out of the holes in the walls in front of you. Crouch or roll under them so that the sharp tips do not touch you. Ahead, around the corner you will see a ladder near the right wall, climb it and jump over the abyss to the left, turn around and notice a small ledge, grab onto it and run forward, jumping over the abyss, reaching the end, you will find the first secret. Jump down and return to the stairs, jump over the gap, turn left, jump over the gap again and run to the left again, then grab the ledge. Climb up, go to the left, climb the ledge again in the same direction, after the turn, jump to the next ledge, climb up and run forward along the passage, it will split in two, and first run to the left, there is a small stone, jump on it, grab the ledge, Climb up and find a first aid kit in the cave. Here bats fly into the cave and try to attack you, to avoid this, deal with the rodents. Now get out of there and return to the place where the cave split in two. Run right, then forward, turn left, kill the newly appeared bats, then jump over the abyss using the cat, in order to safely jump to the opposite side, you will need to pull yourself up on the rope a little. Grab the ledge, climb to the left, jump up to the next ledge, also move to the left and jump to the opposite side, drop down one level and move to the right. When you get over the corner, jump over to the opposite side, climb up there and find the second secret. Climb down the ledges and look around: nearby you will see a recess, jump there, deal with the bats and lower the lever on the right. Go inside and you will fall into a room with a bridge, under which wolves are waiting for you. Shoot the predators immediately. Follow the bridge until it collapses. To the right of the bridge you will find a small cave with a first aid kit. Go back, climb up the broken bridge, turn right and climb the ledges. Turn around and see a ledge on the pillar, jump on it, get around the corner, jump up, then to the opposite side and Lara will hook on the ledge on another pillar. To the right you will find a first aid kit and when you return, again climb up the two large ledges. Go right across the bridge. After the turn, climb up the hill, move to the right and you will see a cliff and a rope. To the left of the rope is a first-aid kit in the recess, take it and return to the previous position. Do not rush to jump to the other side, but go down. Be careful: there you will have to fight with a bear. Now you will see ledges on which you can climb up, but go into the cave that is nearby, lower the lever there and enter the opening. Here you will find the third secret. Go outside, climb over the broken bridge and follow the already familiar path. When you get to the rope, jump on it and swing. After jumping to the other side, run behind the far left pillar and take a first aid kit there. Now go down the stairs, go down the passage, turn right and jump onto the horizontal pole. Jump forward from it, climb up. Head forward and turning right, carefully move along the passage so that the arrows flying out of the walls do not touch you. Now step on the square slab. Now turn left and climb up the ledges, defeat the wolves, climb up the ledges, climb over to the right and lower the mechanism. Run left along the passage to the very end. On the left, grab a horizontal pole in a jump, pass two more of the same, and you will find yourself in a room with wolves that you should deal with, and then climb the ledges and immediately jump onto the pole, which will move at an angle of 90 degrees. Swing and lower the stone mechanism. When you do this, the gate below will open. Now return to the horizontal pole again, which turns 90 degrees, but this time jump off it, when it has not yet had time to turn completely and Lara will catch on the ledge above the gate, climb over it to the left, jump onto the pole, move on it a little to the right and jump forward. Lara will grab onto the ledge, after which you need to jump up and from there to the next pole. Cling to the ledge again, climb up and here you will find the first relic in the game, i.e. golden secret.
All relics that you find during the game will be stored in Lara's house, namely in a secret room with artifacts.
Now go down and now, having entered the gate, you can go to the next level.
2. Peru - City of Vilcabamba
We jump on the pole in front, we go down on it. Behind the stone is a small first aid kit. Now we go forward, we cling to the gap on the right, climb higher, jump back and cling to the second pillar, and jump forward from it. We go further, there will be 2 wolves, having dealt with them, we go to the well. The bear will run out, having finished with it, we jump into the water and swim where it swims, then we lower the lever that opens the grate at the top, and we emerge. We go up the stairs, then we jump over to the second window sill. We move the box away, you can also move it to the niche on the right and in this way get to another first-aid kit. With a shot we open the gate on the left, and move the box to the pillar, climb it and as a result of several jumps we get to the only secret on this level. Now we go back to where the box originally stood, go into the passage and pick up the cartridges and the key to the door there.Now we leave, after passing the gate we go to the left and back, open the door with the key and prepare for a meeting with three wolves. Now we need to open the gate. We go into the passage to the right of them. In the room with the pool, we move to the right passage above along the ledges on the wall. There, having dealt with bats, we jump over to the other side. We go forward, jump and cling to the beam, then release it. In the second pass, everything is the same. After opening the gate, we go forward along a long corridor. Next, obstacles begin (at the bottom there are cartridges and a wolf, you can get out of the pit by moving the box to the ledges in the wall near the place where you came from), first we jump forward, slide down the slope and cling to the pole, swing on it and jump forward. Next, we overcome the abyss with the help of a pillar. We go forward, cling to the ledges in the wall and go down to the bottom of the pit. We go forward, climb onto the stone on the right and from it along the wall we move to the right, jump back onto the pole, swing and jump forward, then higher, climb to the left and jump back, onto the pillar, from it - forward. Again we go along the long corridor and go to the next level.
3. Peru - The Lost Valley
We go forward, jump down and deal with a pack of wolves. To the right of the waterfall we select the first gear and climb to the very top. We go to the bridge, jump over the water and climb up the wall on the right, then jump back. We shoot at the rope at the top and get to the passage a little to the right. Next, we overcome the abyss with the help of a cat and climb to the very top along the ledges in the wall, go into the passage and cross the suspension bridge to the other side, there we select the second gear. Bats will fly out, shooting them, we knock out the bridge on which they came. Now if you look closely, you can see a small cave to the right of the wreckage of the bridge. If you catch the cat on the ring and go down lower, you can jump up to it and get a shotgun as a prize. Now you can fall into the water and Lara will be carried by the current to the very beginning of the level. Here, under water, you can take a small first aid kit. We get out of the water, deal with another portion of the wolves. To the left is a ladder, climb it, insert the gear into the mechanism and lower the lever. Then we move higher along the wheel, insert the second gear and lower another lever. Now we cling to the ledges on the wall, along them we move to the right and up, then we jump back. Next, we jump and cling to the ledges on the left, if we face the waterfall, we move to the right along them; a little lower in the cave is a large first-aid box. Taking it or not, we climb higher and then jump back onto the rope. We turn left, swing on it, jump off and crawl to the right, then let go of our hands and go into a small cave. There we deal with the bear and climb up the ledges. If you look around from the platform on which the cartridges lie, you can see the cave in which the first secret is located. To get into it, you need to jump onto the sloping roof, slide down it and jump again. This will allow you to grab onto the ledge at the corner of the building. Now we return back to the area with the pillars and climb the pillar, jump to the ledges under the ceiling and then back to the pillar, only this time Lara will stand on it. We jump over to the second pillar, from it - into the passage. There we go to the left, jump onto the slope, move down it and cling to the ledge, from there we jump to the right. Further - on a pole, we swing on it, we jump forward and get out. We go forward, jump to the ledges and move along them to the first-aid kit (there is another one below in the cave), shoot the bats and go further along the long passage. Now we shoot the raptors. T-Rex will appear, shoot at him until the anger bar is full, when he runs at Lara, press the somersault in any direction, and when the target turns red - shoot, and so on several times. When it's over, we climb into the temple (or whatever it is) and pick up the last gear there, then we fall into the water and swim where we swim. We get out of the water, climb up the pillar and then along the ledges in the walls we get to the passage above. We leave, we immediately go to the right (you can take a first-aid kit in front), we climb higher, we go forward. Next, we climb up the pillar, jump, go forward, cling to the ledges and get to the wooden bridge. We go along it, slide down and climb onto the pole from it, jump forward into the cave. There we go forward, climb up and jump over the abyss in the wooden bridge. Again, we move upward along the ledges. Ahead are two cascading ramps. Well, the second secret, for the company. To get to it, you need to carefully jump over the first slope and get to the platform behind it, and then go down. We take the secret, climb out and return back to the slopes. We jump to the first slope, from it to the second and from there to the poles. We go forward into the cave, again we slide down and cling to the ledge in a familiar place. In the same way we get to the waterfall and insert the third gear. Before you go into the cave, you can take a relic. We go up to the dam. And jump into the water. Now there is no current, therefore, having examined the bottom of the resulting backwater, you can find a small underwater hole, which leads to the goal. Now we jump into the water and go into the cave, from where we get to the next level.
4. Peru - Tomb of Qualopec
We go forward, then we move along the pillars to the other side and go out into the round hall. We go forward, a stone will roll from there - we immediately run back and hide around the corner. Now we go down and move the wooden pole with a platform at the top to the middle of the abyss to the left of the passage from which the stone rolled out. Now we move a massive fragment of the pillar to the ledges on the wall and climb out. We jump onto the pillar, which has just been moved, from it - into the passage. We cling to the pole, from it - to the ledges and crawl along the wall. When there is a dead end, we jump back - to the stairs, from it - to the right and then back again. We go forward along the corridor, along the way we select a few more first-aid kits. Next, we overcome the corridor with pegs, everything is quite simple here. In a small hall, with the help of a cat, we climb onto a collapsed staircase, from it - onto a pillar on the left, then onto the crossbar and forward. Next, we go along the boards and jump down, hanging on the lever. The first grate has opened, we return back the same way, only now we will meet a raptor along the way. Having reached the pillar, we jump from it to the left and climb up, then onto the striped pillar and forward from it. Once in place, we shoot at the rope on which the plate is hung. With the help of a cat, we get to the niche opposite and lower the lever there, then again we go down to the bottom of the pit and move both pillars to the opposite cliff. We go into that passage, having reached the pit - and there is the first secret in it - first we jump onto the pillar, then onto the wall on the left, climb the ledges and then jump back to another pillar. We go further, in a small hall with a lever the floor will collapse. Having dealt with the wolves, we go to the wooden platform, pull out the box from the niche in the wall, move it to the right pillar, climb there as high as possible and jump back to the beam, from it to the next one and from there to the second pillar. We climb on it to the right, from there we jump to the pole and jump forward. There we cling to the ledges and jump back to the beam. To take the second secret, you need to climb up it higher and jump into the passage located on the opposite side of the lever. Now we return to this beam again, climb along it to the very top and jump towards the lever. By pressing it, we jump onto the pole on the right, from it - onto the ledges and climb up them, having reached the niche, we jump from the second passage. Now we go back to the main hall, on the way there will be a raptor again. We go into the open passage and watch a long video, after it we run back and run to the exit from the cave, watch another video, after which we get to the next level.
5.Greece-St. Francis Folly - Part I
Shoot the beasts in front (it's safer to do this from one of the columns).Climb up the two ledges to the 1st right column. Jump over to the 2nd right column. Climb to the right and cling to the ledge above - and again the same way. Jump to the 3rd right column. Climb up and jump onto the 3rd left column. Climb to the right and cling to the ledge above - and again the same way. Climb to the top of the column and jump to the balcony with bars. Jump to the adjacent balcony. Jump forward, cling to the "cat", run along the wall and jump forward. Step on the button in front of the fresco, ahead on the left. Go left and look at another fresco, with gems. “Press” with shots the corresponding buttons on the first (main) fresco - the tip of the sword and the left eye of the head of Medusa Gorgon. Step on the button. Return to the opened passage (where the second fresco was). Jump to the balcony ahead. Contemplate the third fresco on the floor. Return to the first fresco and "dial" a new combination - the hand, lower back and feet. Approach the ball on the pedestal with a “cat”, pull out the rings holding the axle and push the ball down. Step on the button again. Now or later, you can “press” the combination of the secret - the blade of the sword, the hand, the left eye of Medusa, the lower back, the feet and the knee. Go down - the easiest way is to hang on the “cat” (where you ran along the wall), go down as much as possible on a cable and just jump off. Roll the ball onto the round button on the floor. Climb up the ledge on the 4th right column. Climb to the right and cling to the ledge above. Climb up two ledges. Jump to the 4th left column. Climb to the left and cling to the ledge above - and again the same way. Cling to the ledge above. Climb up the column. If the combination for the secret is typed, jump to the balcony with bars, take the artifact (secret 1), jump back and climb up the column. Jump to the balcony with small columns and go through the open door. Go to the left and cling to the "cat". Climb down the cable or run along the wall and go down the stairs. Push the lever. Examine the fourth fresco above the door - this is a combination for a secret, if it is not collected, then you can go back and get it. Go to the hall, kill the animals and roll the ball to another round button in the floor. Go through the opened door and go down the stairs. Go through the door and jump to the U-shaped platform in the center of the hall. “Cat” push the platform with the ring in front, drop the column with the ring at the bottom right and “press” the button under the balcony from which you jumped with a shot. Jump onto the platform with the ring extended by the “cat”, from it to the next one (on the left), then into a large niche in the wall. Jump on the pole, from it to the ledge. Climb up the stairs and press the lever. Kill the bats and jump to the U-shaped platform in the center of the hall. Again, jump to the platform with the ring extended by the “cat” and jump over to the ledge on the right. Jump down (to the niche), climb the ledge to the right, cling to the ledge below, climb to the right. Slide down the slope and jump onto the ledge. Climb to the left, cling to the ledge below. Again cling to the ledge in the niche, climb to the left, jump to the ledge on the left and climb to the left again. Jump on the pole, jump into the niche, climb higher and take the artifact (secret 2). Get down and jump back to the pole, and from the pole to the ledge. Cling to the ledge below and get down into the niche. Jump into the adjacent niche (on the left), climb onto the ledge, climb to the left, jump onto the ledge on the left, jump down and slide down into the niche. Press the lever, go down the two ledges. Walk left and press the lever. Climb onto the square fragment of the column in the center and jump to another, higher one. Climb onto it, then onto the ledge, climb to the right and jump onto the stairs. Climb up and push the “cat” platform with the ring on the left, jump onto it. Jump to the ledge on the right, climb to the right, jump to the ledge on the right. Jump again to the ledge on the right, cling to the ledge above, get over to the right and cling to the ledge above again. Climb into the niche, climb the ledge, go through the low hole to the right.
Poseidon
Enter the door and go down the passage. Click on the lever and grab onto the ledge on the grate. When the grate rises - jump to the ledge on the wall to the left or right, when the grate goes down - jump back to the hole above the door. Go forward and go down. Kill the rats, move on and dive into the water. Swim down, press the lever, swim further and surface. Get out of the water and dive into the pool ahead. Press the lever underwater on the other side, float up and out of the water. Climb onto the fragment of the square column in the center, climb onto the ledge, then onto the next one, climb to the right and climb up. Move the cube to the left, away from the fish. Swim to the niche and take the artifact (secret 3). Press the lever underwater, emerge. Swim to the niche with the cube (no fish) and push the latter into the water. Return to the first cube and put it in place (turn off the water). Jump into the water below and swim towards the second cube. Get out of the water and move the cube to the fish (the water level will drop again). Climb down the two ledges and the debris to the right of the entrance. “Cat” move the raft counterclockwise relative to the column in the center of the hall, onto the grate. Climb to the very top and move the cube. Jump the water below. Move the raft with the “cat” so that when it emerges, it will be between the two walkways above. Move the cube away from the fish. Ascend, "cat" move the raft closer to the wall. Climb onto the raft, jump into the niche, climb onto the ledge on the right and climb to the right. Jump to the ledge on the right and climb into the opening. Take the key, press the lever. Swim to the exit (you can first turn off the water and get on dry land), swim out to where you dived at the beginning. Walk back down the aisle. Press the lever and cling to the ledge on the grate. When the grate starts to descend, jump up and grab onto it. Go forward, go down, go further and exit. Jump from the retracted platform to the ledge ahead on the right. Climb right and jump onto the platform. Jump over to another platform and knock over the column with the ring with the “cat”. Climb to the ledge on the left, climb to the right, cling to the ledge above, jump over to the ledge on the left. Get on the platform. Walk along the overturned column on the right. Climb onto the ledge on the left, and from it jump over to the ledge on the right. Climb up to the next ledge, grab onto the ledge ahead and climb over to the right. Climb to the ledge above and climb onto the platform above. Climb up the stairs and press the lever. Jump over to the U-shaped platform in the center. Jump over to the platform with the ring and jump over to the ledge on the right. Jump down, climb the ledge to the right, cling to the ledge below, climb to the right. Climb to the left, jump to the platform below.
Greece-St. Francis Folly - Part II
Atlas
Go through the door and down the aisle. Go ahead and rotate the winch before the two platforms close the gap. Jump over to the other side. Climb onto the ledge on the left, jump over to the left ledge. Climb to the left and cling to the ledge above. Climb up, go down to the left and press the lever. Go downstairs “press” the two buttons on the sides of the statue with the ball by shooting. Quickly run towards the abyss, jump onto the pole and across the abyss. Rotate the winch again, get over the abyss and take the key. Climb onto the rubble by the column, climb onto the column. Climb up. Climb up the ledge on the left and take the artifact (secret 4). Climb back and press the lever. Climb down and cross the abyss. Move on. When the portcullis rises - jump to the pole behind, when the portcullis goes down - jump back to the hole above the door. Go ahead and exit. Jump to the ledge ahead on the left. Move to the left, jump to the stupas on the left, climb to the left and jump to the ledge above. Jump over to the ledge on the left. Climb onto the fragment of the platform and climb onto the ledge.Climb up, jump over to the platform on the right. Climb to the right and cling to the ledge above. Jump over to the right, climb into the niche and jump onto the pole. Jump to the ledge and go down into the niche. Go through the low hole and climb the ledge to the right. Climb up at the door.
Hephaestus
Enter the door and go down the passage. The lever can not be pressed - the grate is broken. Climb up the ledge on the left. Rise above. Climbing the ledges, left or right, get to the hole above the door. Go through the hole and go down. In the hall with lightning, go along the lowered slabs (lightning does not strike there) and step on four buttons. Go to the opened room. Move the warrior statue to the round button facing in the direction of the arrow. Move the stone block to the square button, with the resulting statue, do the same as the first one. Step on the square button and jump back. Quickly climb onto the hammer and jump over to the platform to the right of the hammer. Jump to the pole, jump to the area above the key. Take the artifact on the left (secret 5). Jump to the next pole and onto the next platform. Push the stone block down and go down. Place the last statue. Run over the square button and take the key. Go back. Press the lever, climb onto the ledge on the grate. Go through the hole above the door, get down. Move on and exit. Jump to the stairs on the left ahead and go down. Jump to the platform with the fallen column. Go forward along the column, climb the ledge on the left and move the crate to the left. Jump over to the ledge on the right and move the other crate to the left. Climb onto the crate and jump onto the ledge. Move to the left, go down to the ledge below and jump to the left. Climb to the right, go down to the ledge below and into the niche. Go down to the ledge below, climb to the right and go down into the niche. Drive to the door.
Damocles
Enter and go down the aisle. Pull out the “cat” stone block above the door. Press the lever and place the block under the grate. Climb up the block and the ledge on the grate to the hole above the door. Go forward, go down, go further and step on the button in front of the door. Go forward, take the key and quickly jump forward. Climb up the collapsed platform ahead on the left, use the cat to run along the wall and jump onto the platform in the corner. Jump to the platform in the center. On the ledges ahead, move to the niche on the right, press the lever. Climb down and go to the hall with swords. Ignore the advice about walking slowly - swords only fall where they are ©. Look at the ceiling so as not to get hit by a falling sword. Go right, stand between the blades and the wall. When the blades in two cells go down - stand on the white one, when the next ones go down - again stand on the white one, and so on until you can go to the white square between the two columns. Go left, shortening from the falling swords, bypassing the blades along the red cage near the wall, climb onto the fragment of the column. Jump to the ledge on the wall. Cling to the ledge above and climb to the left, into the niche. Press the lever, jump over the swords to the entrance to the hall where the key was, again climb onto the platform in the center, jump over to the left niche and take the artifact (secret 6). Climb down and get to the lever again (now the blades can be bypassed along the white cage against the wall). Climb up the small pillar and jump from it to the big one. Jump over to the adjacent column, jump over to the small column and go down into the niche. Jump over to the ledge, get over to the ledge above. Use the cat to run along the wall and jump onto the column on the left. Jump to the next column, from it to the next, and from it to the last. Jump to the ledge ahead. Jump to the ledge on the right, and then to the next one. Move to the right and jump into the niche. Turn the winch, go downstairs, go through the door. Get down, insert the keys into the appropriate locks and go through the door - to the next level.
6.Greece-Coliseum
We go forward along a long corridor, kill two rats and along the stone blocks on the left we get to a hole in the floor with water. We dive, we swim to the right, to the left, again to the right and up. We get out of the water, deal with rats and bats. On the ledges in the wall on the left you can get to a large first aid kit, it lies on a cage. Now we climb in the opposite direction, we move over the water on our hands and jump back onto the pole, from it - to a large cage. We jump over the fence in front and go into the passage and kill two gorillas. Now, if you stand facing the statue, we go to the right and climb up the collapsed stones. We go to the very top and climb as high as possible along the cracks in the column and jump back. Now we jump forward, we go, we move down the ramp and from there we get to the building. There is a grate that needs a key to open. On the balcony ahead, we lower the lever and go into the opened passage, before that we have dealt with the beast that ran out. In the hall behind the opened grate on the right on the cage lies the key we need, first we go to the right, with the cat we move the small cage from the large cage and move it to the cage with the key, climb it and take the key. We go back, we deal with two more animals and in the same way we get to the lattice on the balcony. Open it with the key and climb up the stairs. We go to the left, jump over the gap and move on with the help of the cat. To take the secret, you need to go down lower on the first ring in order to jump not to the platform, but to the second ring. On it, turn left in the direction of travel and also go down lower - after swinging well, you can jump to a small cave. Another bonus is taken in the same places. Clinging to the crack of the column and jumping off it to the left, you can replenish the fleet of weapons with pistols of 50 caliber. You can return to the starting position on your hands. Further and along the columns we move to the roof of the second building. We go along it forward, we jump to the stone below and from there to the balcony. We go into the passage and go to the next level.
7. Greece - Midas's Palace
We go forward, deal with three gorillas and climb up the ledges to the right of the statue and lower the lever there. A passage will open, go there. We leave into a large hall with a column in the middle and go into the passage on the left, deal with the animal and the cat, pull out the supports, the column will collapse and the ingot will fall out, pick it up and go back. We pass the hall, now covered with sand, and go back to where we came from, but this time we turn left and go up the stairs. We climb the stones on the right to the top, move to the right and run along the wall to the ledges opposite. We climb to the right, jump onto the rope, swing and jump towards the column near the wall. We climb up it and jump back to a large ledge. From there we jump onto a column in the middle of the hall, slide down it, jump onto a stone and cling to a crack in the same column, from there we jump back and along the ledges on the left we get to the passage. We kill two more gorillas and we lower the lever, we go into the opened door. We leave in the big hall with water. A crocodile swims there, it is easier to shoot him. If you step on the plate from the front, then fire will flash everywhere. We fall into the water and lower the lever, now we get out (to the right or left of the place where we came from) and jump to the round thing in front. You have to stay away from the fire here. Next, we jump over to the right, and along the ledges in the protruding column we climb to the very top and jump back into the niche with the lever, lower it. We go to the right and run along the wall, jump down and along the ledges and slopes we move to the right, then we jump into the niche and there we lower another lever. We return to where we came from, jump to the second round thing with fire and from there we jump to the left, cling and move to the left, jump to a small platform, from it to the stairs, climb up and lower another lever. We jump back to the column with shields and fire, crawl up it, jump from there to the second one, climb as high as possible and jump back to the balcony.We pick up the second ingot there and return to the main hall, having dealt with two more gorillas along the way. We go to the left, climb up the ledges and lower the lever, go through the door. We go into the passage ahead, to the right of the stairs we move the box and lower the lever, now we go up the stairs and activate another lever there. Now you need to quickly jump over the pillars to the ingot. Also on the right is a secret, and in the far left corner is a relic. Taking the ingot, we leave into the main hall. We put all the ingots in the right hand of Midas, they will become gold. Now put them in their places and move on to the next level.
8. Greece – Tomb of Tohican
We get out of the water, move the box forward into the passage. There we kill the rats and move the box to the lever on the right, climb onto it and lower the lever. We go down, kill two more rats and go out into the large hall. Below are three crocodiles, we go down and kill them in order to avoid inconvenience. Back you can get out on the ledges on one of the columns. We go along the bridge to the right and turn the lever, the hall will be filled with water. Behind one of the columns there is a lever, we lower it and the grate will open below, under it there is a secret. There is a box in the niche on the left, we swim a little further - it will be possible to get out there. Push it down and turn the lever again to let the water go. We go down again, it will be easier to just jump into the water. We get out and then we turn one more lever, the water will go away completely. Now we push the box to the very bottom, move it to the plate on the right, climb up and turn the upper lever again, the raft will float. Use the cat to move it as close as possible to the second box. Here you will have to pump out the water again and drag the raft a little along the ground. We push the box down, pump out the water and put it on the second plate. Now we need to move the raft as close as possible to the passage with the heads, from the mouth of which water flows, again through the water and the earth. From the raft we jump there and fall into the water and go with the flow. Once in a large pool, we swim into the passage on the right and swim forward, into another passage and lower the lever there, the door of the temple will open. Now let's get up and go there. After the video, you will have to fight with the revived centaurs. We shoot at them until the band of anger is filled, when they try to freeze Lara (a green beam will appear) just turn away from them. When they run to Lara, we press somersault to the right or left, and when the target turns red, we shoot. With an accurate hit, the centaur will stop, with a cat we tear out a shield from his hands, with the second we do the same. When they freeze Lara again, we pick up a shield and reflect the rays into them, when they freeze, we shoot and so on several times. After dealing with them, we get to the next level.
9. Egypt – Temple of Khamoon
So, welcome to Egypt - the country of pyramids and pharaohs. Egypt is already familiar to you from the first and fourth parts of the Tomb Raider series. Go along the corridor, at the end go down and with the help of the cat lower the two columns that are located at the right and left walls. On the left, pull the yellow box out of the wall and take the first-aid kit with cartridges behind it. Then climb onto the fragment of the column next to the box, take the first-aid kit at the top and climb to the left, there along the ledges get to the horizontal pole, then jump from the slope to the fragment of the column, climb over the corner and along the poles get to the next square column. Climb up the ledges to the right, run along the corridor, jump over the abyss along the pole and go out into the passage of the destroyed wall, deal with the predator that will be waiting for you below, and when you climb the elevation ahead, look to the left and notice a small ledge. On it, move to the left to another ledge and climb into the gap along the ledges, also move to the left, where you will find a first aid kit. Return and go to the same elevation and after the video, get rid of the mummies. Not far from the reservoir there is a circle from which you can jump onto the column. First you need to climb the column up and jump to another, and also move up. Now, when you are on the next platform, on the right wall, shoot at the target and run along the pole that appears to the next platform, from there along the columns to the Sphinx, where the stairs are. Climb up the stairs and go over the head of the Sphinx into the broken wall. On the right there is a small gap where you can climb and find the first secret. From the head of the Sphinx, jump over the abyss with the help of a cat, run along the wall and go down the ramp from the next platform. Lower the lever, and to the right of it go down the slope, and after that go through the opened door. Bypassing the corridor, you will find yourself in a room with statues. Do not let the animals living here attack you and then lower the lever at the opposite end of the corridor. The statues will approach each other and quickly run to the statue closest to the entrance. Again, predators will try to interfere with you, deal with them and lower the lever again. From the first statue, jump to the opposite statue and then get to the wall you can run along. Follow the ledges and get to the entrance to the corridor. There, go down the ramp, shoot the bats and move the yellow box to the other side of the corridor around the corner. Climb up and move on. Go down the ramp and pick up the ammo. Now go back up and stand against the left wall, then a horizontal pole should appear in front. When you find yourself on the opposite side, having made your way there along the poles, run along the corridor, and going outside, fight the crocodiles. Here you will notice a large statue of a cat, remember its location, because you still have to return here. Jump into the water in the middle of the hall, and lowering the lever there, quickly swim to the left until the grate is closed. Now float up outside and jump onto the falling ledge, from it jump over to the platform and quickly cling to the edge of the platform receding in the opposite direction. Climb over the ledges to the left and wait for the plates to converge again. Jump to the opposite side of the ledge and run along the platform that goes into the wall to the nearest falling ledge. Climb into the opening on the right and pick up the ammo below. Now jump onto the pillar, from it along the ledges to the crown, and from the pillar opposite, jump to the lever and lower it. Come outside. Move the box to the opposite side to the ledge on the wall and climb onto the platform that goes into the wall, from it move along the ledges to the horizontal pole. Now use the cat to open the square wooden panel and use the same cat tool to jump over there. Lower the lever and climb up the ledges on the opened doors. Here again the lever, when you lower it, you will see how the opening opened down under the huge cat statue. But before you go there, look to the left, and you will notice a ring on the wall for which you can catch a cat. Run up the wall to a ledge. And from it, jump in the opposite direction and hook on the ring on the ceiling with a hook. Ahead are two more of the same and when you jump over to the roof, which is located directly above the Egyptian cat, you will find the second secret. Jump into the water and when you get outside, go down into the passage under the same cat statue. In the next room, insidious predators will be waiting for you. After you deal with them, go to the room where they languished, and you will find a first aid kit there. Go back and lower the lever, then the grate will open and you will again have to fight the predators. After that, climb up the ledges and shoot at the target that is on the wall to your left. On the ring that has fallen from the ceiling, jump over to the opposite side and after picking up the cartridges there, go back to the platform and run into the opening at its other end. After passing along the corridor, you will find yourself in the next room and. Here you will be attacked by a predator, from which you must immediately get rid of.Climb up the hill on the left and after you pass the long ladder, shoot the mummy and climb the small blocks to the wall on the right, run along it and jump to the top of the pillar, and you will see three similar high pillars near the wall. On each of them there are ledges, with the help of which you need to get to the other side of the middle pillar. There is a ledge on the wall, and to the right you can run along the wall and push off from it, you will find yourself on an oblong platform, where you will find the third secret. Get down and go into the opening, which is next to the pillars. Climb up the ladder and lower the lever and now move along the extended platforms with statues to the other side of the room. There, around the corner, lower the lever and return to the pillars, but this time jump from the top of one of them to the ledge, and from it jump to the left to lower the lever of the mechanism. Near you will open a passage down, get down there and go along the corridor. In the next room, you have to solve a riddle in order to open the doors ahead. There are blocks around the walls, move them and in the rooms that they closed, you will find a clue, there, on the walls there are drawings showing how to move each of the mechanisms that open the doors. If the doors do not open immediately, turn the mechanisms so that the pictures match exactly until they click. But before moving on to the next level, jump onto the block to the right of the gate and jump along the ledges on the walls along the tops of the obelisks to the opposite side, where you can climb up the ledge into a small room. Here you will find a relic. Now get down and go into the passage, once closed by gates, and from there to the next level.
10. Egypt - Obelisk of Khamoon
Go into the hall, lower the lever on the right, and when the platform drops, take the first artifact and go down the stairs, go into the passage and go between the shifting blocks. In the next room, lower the lever and quickly jump onto the rising column, from there jump onto the pole, from it climb the ledges to the platform that goes into the wall, from the next plate jump to the platform with square columns. There is a lever hidden behind the rocks. Lower it and jump to the left platform as quickly as possible, climb over the three square columns to the ledge, jump onto the pole, then run along the next platform to the ledge and get over to the opposite side, where the plate goes into the wall. Jump forward and from the first square column, jump to the left one, go up to the platform it is on and jump to the ledges that are nearby on the wall. From the top, jump off in the opposite direction and quickly run along the wall, preferably twice and hook onto the next ledge. From it, jump to the left and from there climb up the square columns. There are two poles here, jump to the left one if it is not already hidden behind the wall. If it is not there, then you need to go back and lower the lever at the bottom. When you have safely reached this pole, then jumping forward from it, you will find the first secret. On the same pole, jump to the platform, and from it to the next pole. Carefully enter the next passage and fight the mummy. Now jump on the poles to the lowering ledge, and from the ledge above, jump to the left. Run between the sliding blocks and find yourself in the next room, where the grate is on the left, which must be removed to open the passage. To do this, run to the right and lower the lever. A passage will open to the left, and a second platform will drop below. Now go back and go to the open passage on the left. Here you have to pass a trap - blades that will come out of the walls. Wait for the moment when they hide and crawl between them. Ahead, pass a similar obstacle where you need to jump over the blades on a horizontal pole. After the corridor, go down and deal with the mummy. Behind the column next to the wall are cartridges, take them and lower the lever. Now pull out the yellow box and take the first aid kit behind it. Climb onto the box and jump over the ledges to the left, run along the wall and from the ledges in front jump to the platform. Take the first-aid kit and cartridges from the step, then climb the ledges on the right and run along the wall when the blade disappears. From the next ledges, jump to the left and run along the wall again, now you should get to the ledge that is higher than the one from which you jumped. When you do, jump in the opposite direction, wait for the blade to go behind the wall, run along the wall and jump onto the square steps. Now jump to the right and run along the wall again, when you are at the corner, jump in the opposite direction and also run along the wall with the help of the cat. Go down to the platform below and find the second secret. Now go down and make the same difficult path to the square steps at the top. Also run the walls twice with the help of the cat, but this time do not go down to the platform below, but run to the end of the wall where the stove is. From it, along the ledges, move to the passage on the left, bypassing the corridor, lower the lever and see how the third platform will drop below. Run back along the corridor, use the cat to jump over the abyss and cling to the ledge, climb over it to the right and go down the square steps. Now turn right and enter the open passage. Pass the colliding blocks and take the third artifact. Jump to the platform on the left, in the corridor, pass new obstacles consisting of colliding blocks and blades. After that, go into the next room. On the left side, go down and deal with the mummies. Now jump up the three ledges and jump to the left, move along the ledges to the left and climb up. There, jump onto the square stone and cross the ledge to the left and fall down. Lara in flight will grab onto the ledge below, and all you have to do is cross to the left and climb into a small depression to get the third secret. Climb down and up the three ledges, run between the blades and shifting blocks in the corridor, then lower the lever and watch the fourth platform drop. Go outside and you will see a square stone on the right, climb on it, run along the wall with the help of a cat, climb up the ledges and run to the right along the steps. There, again climb up the ledges and jump to the lever and thereby lower it. Blades will start coming out of the walls, but that's where you need to go. Get down from the lever to the ledge below, jump to the right along the ledges to the platform, then jump onto the ledges on the left and jump in the opposite direction. Climb up to the next platform and you will see a hook on the wall that you can hook onto with a cat. Rise a little and start moving in different directions, on the opposite side you will see a small plate, jump on it and wait until the blade moves to the left side, jump to the ledge on the right, from it to the horizontal pole and jump to the plate in front, there you can find cartridges and fourth secret. Jump to the slab on the right and with the help of the cat run along the wall, take the ammo there and return to the place where you were heading after you lowered the lever. Go into the same passage you came out of and go down the corridor where you have to pass blades and shifting blocks. Come out to the platform ahead and take the artifact. Jump to the left platform and pick up another artifact there and see how the grate descends under the water below. Jump there and swim forward, then go outside, lower the lever and you will see how a passage opens in the hall with statues, go up the ladder and go out into the hall. Run into the passage on the left, from which you once entered the hall, and after the corridor you will find yourself in an already familiar room with an obelisk. Deal with the monster and insert all the artifacts into the cells on the obelisk.Now go through the opened gate and go to the next level.
11. Egypt - Sanctuary of Scion - Part I
Run down the stairs and when you deal with the mummies, you will see four columns that must be turned as shown in the picture. First you need to turn the far left column two times to the right, and then the near right one also two times to the right. A pillar will rise in the middle of the room, climb up and overcome the trap with pillars, after which you will fall into a huge hall with a Sphinx. Get down and go to the stairs opposite the Sphinx. Climb up and jump to the right, get on the poles to the next ladder and when you go up, jump to the left. There, pick up the cartridges with the first-aid kit and run to the right, along the ledges, get to the opposite side. To the right you will see a column, climb up the ledges on its surface and shoot at the flying creatures. Run to the left and use the cat to jump over to the head of the sphinx, take the pistols and return, after it jump to the pole on the left, from it to the platforms forward and go down the ledges, lower the lever there. Now run into the opening on the left and pass the obstacles with pillars. And when you go outside, jump onto the ledges on the left and go down the stairs, but not completely, near the end of the stairs, jump from it to the right, climb over the ledge and there you will find the first secret. Jump into the water and climb onto a small square platform, from it jump to the top of a column barely protruding from the water, climb up the ledges and jump to the left. The platform will lower, and during its movement, jump up the ledges on it, and after that, from the same ledges, jump to the pole that is behind them. From the ledge, jump to the platform, and from it, along the pole, get to the next ledge, jump to the right from it and another platform will fall. Jump to the opposite side and climb the column to the right, jump to the platform and with the help of the cat, pull out the ring in front and quickly jump to the top of the column, from it to the rising platform, climb up and jump to the ledge on the left, and from it jump to the next descending platform which is to the left. When it descends, jump into the water and climb onto the platform again and lower the first platform in the same way as before. Jump from it to the opposite side, jump from the column to the platform in the middle of the hall and run to the right. Now jump onto the pole on the left and from the ledge jump to the last lowering platform, again jump to the column nearby and from its top jump to the top of the platform, from there jump to the ledges on the right and jump over to the stairs nearby. Climb and jump to the stairs to the left, from it to the ledges to the right and jump over to the platform in the same direction, go down the stairs and lower the lever. A door will open below, go down there, deal with the mummies and take the artifact, then go outside and jump into the water, climb onto the platform and go into the opened passage. When you get to the hall with the sphinx, get rid of the centaur and go to the sphinx, there you will see a closed door. Nearby there are two cells for the artifact, you have only one so far, insert it and go up the stairs on the opposite side of the hall. From the ladder, jump to the ledge on the left and jump over to the ruined steps that are next to the left. Climb onto the stone and get up to the ramp, jump off it and grab onto the ledge. There are three columns, climb to the far one along the ledges on it, climb up and jump over to the middle one, and then to the next one, crawl along it to the other side and jump to the ledges on the wall. Climb up, jump up and shoot the flying creatures. Use the horizontal poles to jump over to the ledge, get to the other side and jump away from it. There, run forward and go down the ledges to the lever, lower it. Run into the passage on the right, there you will see colliding stones, quickly run between them and run further. Here again there will be such stones, but they are much larger and it will not be possible to simply run between them. But if you look closely, you can see a gap between the stones, where you can jump, sit down and wait until the stones disperse again.
Egypt - Sanctuary of Scion - Part II
Enter the room and find yourself in a similar room that you recently visited. Jump to the left and along the ledges get to the stairs, go down, climb onto another ladder, jump over the poles to the ledges, then jump to the left. On the descending platform, climb up and jump onto the column nearby. Climb up the ledges on it and again jump to the other side. Jump to the ledge on the left and use the poles to get to the stairs, from it jump to the ledge, which is located nearby on the other wall, and jump over to the second lowering platform, from it to the ledge on the right and wait for it to fall. Also jump onto the column, make your way up to the ledge from which you jumped here. Jump onto the lowering platform and now jump over to the platform, when it lowers, jump from the column to the platform in the middle of the hall and run along the wall on the left with the help of the cat. Jump from the ledge ahead to the fourth drop-down platform. Just like before, jump from the column to the central platform and use the poles on the right to get to the stairs, climb to the ledges, jump to the left and lower the lever there. Return to the stairs and go down to the platform in the middle, go into the opened passage. Deal with the mummies and take the artifact. Jump into the water, go into the opened passage and in the hall with the sphinx after you deal with the centaurs, insert the second artifact into the desired cell. Enter the passage and after a long corridor you will find yourself in a hall with statues of the ancient Egyptian gods Horus and Seth. Take the first-aid kit on the left and jump into the water. Lower the lever under the water between the statues, the water level will drop. Climb onto the left foot of the statue of Set, use the pole to get to the ledge, get to the other side and run along the wall with the help of the cat, go up the stairs and jump to the ledges on the statue, jump to the left. Here you have to turn the beetles on the wall. Shoot the upper left beetle four times, the upper right beetle two times, the lower right four times, the lower left two times. Lower the lever ahead, the water level will rise. Climb up the stairs, along the ledges get to the pole, from it jump to the ledge, and from the ledge to the lever on the right. A grate will drop under the water. Jump into the water and swim there. Climb up and see the same bugs again. Like the first statue. Shoot the top left beetle twice, shoot the top right four times, and shoot the bottom right four times. The grate in front will rise and now go down a little lower and drop the yellow box into the water. Jump down and lower the lever under the water between the statues. Climb onto the left platform and climb onto the statue's leg as before, jump onto the pole, cross the ledge to the other side, then run along the wall, climb the stairs and along the ledge get to the next ladder, from which jump to the higher ledge. Now move right to the pole and lower the lever on the right. At the bottom, the grate will drop, after it jump into the water, climb to the left platform. Enter the opened passage. Climb the ledges, when you get outside, go down a little lower and you will see a ledge on the right hand of the statue leading to the lever. Make your way along the ledge and lower the lever. Jump down and climb up the statue of Set again. Lower the lever over the beetles and, along the ledges and the pole, get to the lever on the Horus statue. The grate below will drop, swim there, climb up and here, too, lower the lever over the beetles. The water level will rise, and now swim into the passage to the statues of Seth, climb inside the room and see a lowering lever on the right, climb up to the ledge and jump onto the pole.Jump forward, climb to the left and go into the passage, on the right, jump up the ledges and you will be right above the statues of Set and Horus. Run forward to the next ledge, which you need to go down. There, jump into the passage and find a relic. Jump into the water and return to the statue of Seth, swim into the passage, there as before, climb up, lower the lever between the two platforms above the statues, the water level will rise. Swim away from the wall and climb into the passage. In the next room, you have to fight mummies and centaurs, and when you successfully complete this, jump onto the column to the right of the entrance, climb over the ledges on its surface to the other side and jump to the next column. With the help of a cat, jump to the second column from the opposite end of the room, jump from it to the far one, then jump to the gray column closer to the wall. Nearby in the recess on the wall you will find the second secret. Return to the nearest column from which you jumped, climb up to the elevation next to it and attach one part of the artifact there. The grate will partially open. Now again climb onto the first column, which is located to the right of the entrance. Jump over to the second and make your way along it to the right and jump onto the gray pillar nearby. On the wall ahead you will see a hook, hook onto it with a cat and run along the wall, jump away from it to the column on which there are ledges, jump from it to the one next to it. Move along the ledges and notice that there is something to cling to on another column, which is located further from the wall, jump on it, move in a circle and jump over to another elevation, where you need to attach the second part of the artifact. The grate will open completely, and now go into the passage. In the interactive video, press the right, up, and down keys. Level passed.
12. Lost Island - Natla's Mines
So, you got into the mines of Natla and you urgently need to get out of here before the insidious hostess has done anything. There will be a boat in front of you, swim forward, you will see a waterfall on the right, after it there is a passage, when you get there, run to the end of the cave, there will be a horizontal pole on the right, jump on it, then move along the ledges to the left and jump onto the rope to which the iron box is attached , jump from it to the next one. There is a first aid kit on the box to the left, take it and jump back, then onto the rope, swing and cling to the ledge in a jump, climb over the corner and jump into the cave. After getting out of it, you will find a spacious room, in front of you on the ground are small boxes, climb on them, and then jump on the large ones nearby. On the top of them is a first aid kit, take it and go down. Nearby you will see a staircase leading to a small pavilion (let's call it the control center), where you will find panels with control buttons - red, green and blue, but you will need fuses to activate them. To get the first one, run outside and return to the cave from which you left, there will be a railway in front of you, run to the left and then notice the trailer on which the first fuse lies. Take it, don't let the rats that live in this mine bite Lara, and return to the control center. Activate the red button, then on the opposite side of the room the mechanism will move the iron box and the passage will open. Exit the control center and run to the small pavilion ahead. Nearby is a yellow box, move it to the wall of the pavilion and climb onto the roof. But before heading into the passage, look to the right and see two wooden sticks placed vertically. Jump on them and hook on the ledge, from it jump to the left ledge, then up and onto the horizontal pole, parallel to the ledge you are holding on to. From the pole, jump onto the ramp, from it to the wooden platform in front, and there you will find the first secret. Now jump down and return to the yellow box, climb up and run into the passage. When you get outside, you will find yourself on a wooden platform, next to it is a yellow box. Drop it down and jump onto the next wooden platform. Ahead behind the grate lies the second green fuse, climb over the barrier, take it and cling to the hook on the wall on the right with the cat. But do not rush to run to the opposite side to the stairs, but go down the rope a little, as much as it allows. There is a huge pipe down there, there are two ledges on it that you can catch on, to do this, run up the wall a little and when Lara is right above this pipe, jump down and Lara will grab onto the iron ledge on this pipe. Get down to the ground and pick up the third blue guard nearby. Go to the slope near the pipe and jump on it, Lara will grab onto the ledge on the huge pipe and now get over to the right and jump onto the thin pipe from which steam flows, but be careful not to burn yourself. Climb up the ledges into the cave, climb up the stairs there. The passage will be divided into two sides, run to the left and go to the control center. Insert green and blue protect, then press the blue control button and then the iron box suspended above the roof of the pavilion opposite will fall down and the roof will break. Run there and take a couple of pistols, break the glass and return to the beginning of the level where the boat was. Jump into it and change the rope to which it is attached. The boat will float downstream and when it stops at the stone wall on which there is a ledge, jump on it and continue to the right to the next ledge, now jump to the ledge above and to the opposite side, move to the right to the next ledge and you will see boxes with the inscription "Natla". Behind them is the second secret. Jump into the water, like last time, swim to the waterfall, go up and when you jump on the second box hanging on the rope, shoot through the rope of the first box, it will fall, open, and there is a relic inside. After such a find, return to the trailer on which the first red was taken, protect yourself and break the glass that closes the passage to the pavilion, where you need to activate the control button. When you do this, a small engine will stand on the rails and you can ride on it. After the interactive video, take the gun from Larson and go to the control center, re-insert the blue guard and press the button. The passage for the trailer will be free. Drive further, when the locomotive drill destroys the wall, you will see lava and the remains of some structures that can be used to get to the other end of the room. Jump on a small stone slab on the left, forward to the pole, from it to a short beam, and from it jump again to the same pole from which you jumped and Lara will hook on it. Now jump to the left and grab the ledge, climb over it to the left around the corner and now stand on a small piece in a vertically located beam, barely sticking out of the lava. Nearby you will see a stone slab with pistols on it. Take them and go back upstairs, jump over the abyss with the help of a cat, just go down a little lower and turn a little to the right so that Lara can jump not on the slope in front, but beyond it. Swing and at the moment when the probability of flying over this slope will be the highest, release the rope and find yourself on a vertical beam, jump from it to the next one and to the stone slab. There you will find the third secret. Jump onto the ramp, push off from it and cling to the horizontal pole, which will turn 90 degrees, then also onto the ramp, climb up the ledges from it and jump to the ground where the rails are. Turn around and jump onto the wooden platform with the help of the cat, pick up the first-aid kit and ammo there. Return to the rails and run along the passage, push off from the ramp on the right and climb up the stone ledges.After the interactive cutscene, grab the pistols and move the yellow crate to the nearby rock ledge, climb up, then to the right, and when you're at the top, jump straight down the ramp and there's a small hole where you can find a first aid kit and ammo. Go back up and jump on the cones, some of them will go deep, and then symbols will appear at the entrance to the pyramid. When you jump onto the rightmost descending cone, then quickly jump back and grab the ledge, move to the right and up. There you will find the fourth secret. Below is a first aid kit, take it and return to the cones. When all the necessary cones go inside the pyramid, lower the lever at the top, reaching it along the same cones and the entrance to the Great Pyramid will be open to you.
13. Lost Island - The Great Pyramid
Enter the pyramid, run along the corridor, pick up ammo along the way. When you exit, you will find yourself in a spacious room, on the left you will see a closed door, but later it will open. There are cartridges in the far right corner, pick them up and go through the opening. After the video, deal with the enemies and go to the opening to the left of the entrance. Climb up the stairs, go outside. There, winged creatures will be waiting for you, which must be dealt with immediately. There is a first aid kit against the right wall, and cartridges in the middle of the room. Take them and exit into the opening on the right. Bypassing the corridor, exit to the platform, shoot the button 8 times, then fight the winged creatures and shoot the button again. Time is running out quickly, so hurry up, otherwise all the signs around the button will not disappear. Jump to the right, climb over the ledge to another wall and run along it with the help of a cat. In the jump, Lara will grab onto the ledge, go up to the next platform, also shoot the button, kill the enemies and shoot the button again. To the right, climb the ledges to the wall, use the cat to run along the wall to the next ledges. Climb to the next platform, proceed in the same way as on the previous platforms. When the horizontal poles appear, jump to the right, push off the ramp, use the poles and ledges to get to the wall, run along it, push off and jump perpendicular to the wall, use the cat to run along it, and then move along the ledges to the next platform. Also shoot at the button, and when you deal with flying creatures and also shoot at the button, jump onto the ramp, push off from it, use the pole to get to the next ramp, and then jump onto the pole and along the ledges move to a new platform. After doing the same actions with the button and the enemies that appeared, push off from the ramp next to the platform, run along the wall with the help of a cat and jump to the next ramp, after which you also run along the wall to the ledges, and along them get over to the last platform. To the left in the corner you will notice a ledge in the corner, jump on it and, having risen, you will find a secret. Come back, get rid of the flying creature, run into the passage, round the corner to the left are cartridges, and ahead of you are closing and opening jagged doors, between which you must quickly run. There is a first aid kit in front of the second doors, run it and run between the doors and there will be the same doors ahead. After running between them and passing along a short corridor, you will find yourself in the next room, where you will have to fight the enemies. Here you will find that Lara suddenly has a terrible double, repeating all her actions. It is urgently necessary to get rid of it, but you cannot shoot at it, because during the shooting the double will attack you. Before proceeding, run around the room and find ammo in the corners. Turn the round mechanism in the center and climb up one of the two ladders. Climbing one ladder, you will find closed doors and a lever on the left, and if you climb another, you will see only one lever. First, climb up the first ladder and lower the lever to the left of the doors. A hatch will open on the opposite side. Quickly go down and turn the round mechanism again and now go up the second ladder. Here Lara will jump onto the platform, and the double will fall into the hatch that you recently opened. Ahead, lower the lever, deal with the flying enemy and, after descending, turn the round mechanism. Climb the first ladder, go through the opened doors and after the passage you will find yourself in a room with lava and retractable blocks on both sides. Carefully run to the left, passing the retractable blocks, lower the lever and get rid of the flying creature that will try to attack Lara. Go back and run to the right as the blocks pop up, jump over them and get to the other side. There, lower the second lever, deal with the enemy and go into the opening. Look up and see a button on the ceiling. Shoot at it and a piece of the ceiling will fall and a hole will form on the floor. Feel free to jump there and push off the slope, jump over the lava with the help of a cat. In the cave, take a first aid kit and climb the stairs, you will find a relic. Jump out through the small opening in the wall and enter the passage ahead.
14. Lost Island - Final Conflict
After the cutscene, you have to fight the boss, and in order to win, you need to throw him into the lava. To do this, run around the cliff and shoot the monster until it rushes at you in anger. At this point, jump to the side and aim at the head by pressing the left and right keys. The monster will hang by grasping the edge with one hand, which you need to shoot. After he jumps out, move around any of the walls and when he again throws himself at Lara, do the same steps as the first time. The giant will try to yank his arm out and at this time shoot at him and jump up when the legless one will hit the floor with his other hand. Thus, a part of the arm should come off the monster twice. And now again run to the cliff and, as for the first time, make the legless monster hang on one arm. Shoot him in the arm until he falls into the lava. After the battle, go into the opened passage and after reaching the lava, jump over the pieces of earth. Ahead you will see two small pillars, get to the platform along them, deal with the flying creature and lower the lever. Then the platform will start to go into the wall, and the other platform that is ahead will approach you. Jump on it and run around the corner along the passage. After entering the next room, fight the enemy and lower the lever on the wall opposite the entrance. Get rid of the suddenly appeared creature and go to the opened campaign. Enemies will be waiting for you here, deal with them and look around: on the right and left sides you will see two vertically located plates on the wall. Jump on one of them and notice a button behind it, which you need to shoot quickly. Under the water below, one of three hatches will open. Lower the second plate and shoot the button behind it in the same way. Enemies will appear, and after you deal with them, dive under the water and lower the lever there. A small platform will come out of the wall nearby. Get out of the water, fight the enemy creatures and jump onto the platform, go into a small gap in the wall, take the first aid kit and drop the crate down. Turn around and jump to the opposite side, there you will find the first secret. Go outside, move the box to the stone block at the closed doors, climb up and immediately shoot the flying creature. Now lower the lever at the top and move the box into the opened passage. There is a recess in the wall on the left, climb on the crate there and you can find the second secret. Now drag the box back, climb up and move along the ledges on the wall to the corner. There, move closer to another wall and run along it with the help of a cat. Cling to the ledge on the opposite side and climb into the opening. Get down inside and lower the third plate. You will see the button again and shoot it. After the third hatch opens underwater, climb out over the rocks and jump into the water.Swim into the open opening and get out onto the land. Jump over the lava and take a run, cling to the ladder while jumping, jump to the left from it and move up the ledges. From there, jump over to the left and from the ledge, jump in the same direction. Fall down, take the first-aid kit and jump from the lower ledge to the opposite side. Go down again, in front of you there will be two pieces of land and a ledge a little further. But do not rush to jump on it, and from the second piece of land, jump over to the opposite side of the ledge. Behind the lava waterfall you will find the third secret. Move to the ledge along the newly appeared pieces of land. On the ledge that is above, move around the corner and jump along the pillars to a horizontal pole, and from it to a small rest of the earth and forward to land. Climb the stairs and now turn around, this cliff can be jumped over with the help of a cat, and when you find yourself on the opposite side, take the first-aid kit from the wall and jump to the stone platform on the right, also take the first-aid kit and from here jump over into the recess in the wall, which is located to the right of you. Here is the fourth secret. Return to the ladder and run into the passage on the right. After the video, the final battle with Natla will begin. In the first stage, run around the hall, shoot at the enemy, simultaneously dodging her fireballs, with which she will attack you. When Natla's life bar becomes almost half as short, you will see a cutscene, and after that the second part of the battle will begin. Now you also need to quickly shoot at Natla and dodge her fireballs, but this time there will be a rage bar, just like it was with previous bosses. Now you should act in the same way as before. Bring Natla to the most furious state and at the moment when she runs at Lara, jump to the side or on the back, aiming at the head. If you do everything right, Natla will stop for a few seconds and will be vulnerable, shoot at her and repeat these actions until the opponent’s life bar is completely empty. An interactive video will start where you need to press the up, down, down, up and left keys. After that, watch the final video. Congratulations, the game is over.
15. Croft Manor - Part I
So, you are in the main hall. Run to the right and drag the small crate against the wall to the square on the floor in front of the crates. A small window will open in the fireplace. But there is still a fire burning there and Lara is not going to stick her hands in there. The flame must be extinguished, but more on that later. Now climb on the boxes and pick up the gear there. Climb the main stairs and go through the far door on the left side, after the corridor you will find yourself in Lara's bedroom. Not far from the door you will see two small levers in the form of a sword handle. Lower both of them and take the diary. You can open it in your inventory. Leave the corridor and head to the door on the right (if you are facing the wall). When you go there, the door will not open and you need to find another way to get out. But first, run up to the bookshelf on the left and you will see one book almost half pulled out, click on it and a secret door will open nearby, there is a scroll, take it and go up the stairs. In the room on the second floor you will see two more such books on the shelf. Just click on them and take the pistols behind the retracted shelf. Exit and turn right, shoot at the glass behind which there is an elephant (secret 1), take it and return to the passage. There is a picture hanging here, jump on it and then it will fall, behind it you will see a target. Jump away from the painting and shoot there. A passage will open below, go into it, and in front of the boxes in the corridor, take a small barrel on the shelf. At the end of the passage, press the button on the wall and a door will open ahead. Now you will be taken to a room with relics that were found during the game. Climb up to the second floor and shoot the glass behind which is the spearhead, take it and leave the room through the main door. When you pass the corridor and find yourself in the main hall, go through the door to the left of the main staircase. There is a sundial in front of the entrance to the garden, attach the spearhead to it and move to the left, pause at the number 11, the plate on which the number is indicated should rise slightly. Then move in the same direction and stop at number 2, and then at 7. The gate to the garden will open, go into the labyrinth.

Now let's get to the game itself!
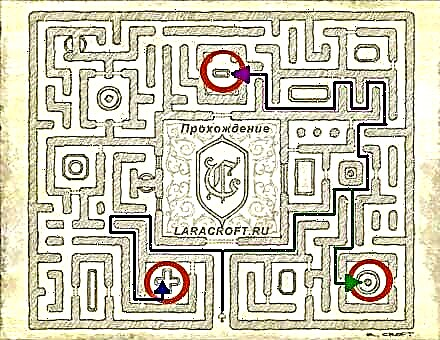
Croft Manor - Part II
Open the garden map and you will see a cross at the bottom left - there is an elephant (secret 2). To find it, at the corners in the maze where the road forks, go left four times and find an elephant (secret 3). To find the second elephant (secret 4) go back to the first turn from this place and turn right three times and run forward through the long passage, when you come to the first turn on the other side, go right and then right twice more and near the statue you will find more one elephant (secret 5). To find the third elephant (secret 6), go to the first turn from which you entered and first go right, then left, forward, left and immediately right and left again, then go ahead and without turning on the turns, approach the elephant (secret 7). Turn around the other way, run forward and turn right, then left, then you will get to the center of the garden, where the statues are. Here you will find a hook called a cat. Nearby there is a small closed square door, pull the ring above it and it will open, there are gears here, one is missing, but you have it. Insert it into place and turn around: now you have a closed gate in front of you. But they can be opened with the help of a cat, if you pull the ring at the top. Exit the garden and return to the house. Climb up the main stairs and go through the first door on the left. There, lower the chandelier with a hook and take away the elephant (secret 8) behind the opened door. Return to the main hall, go through the door to the right of the main staircase. Enter the gym. From mat #1, jump onto the turnstile, then jump over to the ledge on the wall and move left to the next ledge. Jump from it to the turnstile, and when it turns, jump over to the ledge in front and onto the ladder to the right, jump away from it and, having risen, take the first-aid kit and press the button. Now the vertical beams will rise and from the mat number 2 jump onto the stone, and from the ledge on it jump to the left, where the vertical beam is. Jump to the next beam and onto the ledge, move to the left and jump higher and climb to the left again. On the other side, jump off the ledge and climb into the recess in the wall, there take the elephant for yourself (secret 9). Now, from mat #3, jump onto the stone and, jumping to the left from above, run along the wall with the help of a cat. Grab the ledge and move to the left, go down to the ledge below and jump to the right, there, in the recess on the wall, press the button. A pole will turn at the top and now from the same mat No. 3 jump onto a stone and catch the hook on the wall with a cat, jump in the opposite direction from the middle of the wall and push off from the slope, then from one more of the same and jump to the horizontal pole. He will turn around, and then turn around in the other direction, then take the elephant (secret 10). Again, from mat #3, jump to the stone, but this time climb over to the right, from there jump to another stone and climb right and down along the ledges, move to the right along the ledge on the third stone and run along it. Grab the ledge, move right to the pole and when it turns, press the button that is in the recess on the wall. Another pole will turn at the top.Take the first-aid kit and all from the same mat No. 3 climb the ledges on the stone to the right, also move to the right along the ledges on the wall and from the far ledge jump along the poles to the vertical blue pole and jump along the beams to the iron platform under the ceiling. Take the wrench here and get down. After leaving the gym, head to the garden. After leaving the corridor, go right to the end, there are pipes and a scoreboard with light bulbs behind the fence. Go there and turn the screw with a wrench. The plumbing is now on. Go to any fountain and pour water into the small barrel you found on the shelf in the hallway. Come into the main hall and pour the water from the barrel on the fire and pick up the arrow there. Go through the door to the right of the fireplace and you will enter the room where the pool is being built. To the right of the entrance, pull the ring from the spear of the statue, move the red cart closer to the middle and shoot under the wooden board in front, then climb onto the boxes on the right. Jump onto the yellow pole and cross the balcony to the right, jump to the wooden ledge, jump away from it too, and when you climb onto the wooden platform, jump to the pole on the left. Place a red cart with iron sticks on a circle near the statue so that the tip of the tallest stick touches Athena's spear. Naturally, the statue also needs to be moved so that they form an angle, and then the slab next to it will turn the other side, and you will see the target. Shoot at it, and the first hatch will open in the indoor pool. On the right, climb up on the boxes and shoot at the target, then the statue of the archer on the canopy will turn. Take the first-aid kit and go downstairs, jump from the boxes to the pole, get over the balcony and jump off the ledge to the wooden platform. Jump over the chasm with the stick sticking out of the red cart below. On the other side, run along the wall and drop down the crate next to it. Run to the distant horse statue and shoot at the target under it. Now, with the help of the cat, lower the celestial globe to the floor that Atlas is holding, and place it on a circle near the statue of a giant. A second hatch will open in the indoor pool. Now go downstairs and make sure that the box that you dropped down is directly in front of the board, the ends of which are balanced. Stand on the box and, pulling the end of the board towards you so that it falls in front of you, quickly jump up it and hook on the boards in front. Move along them to the right and jump in the opposite direction. Lara will cling to the boards, and now move along them a little to the left to the middle and jump away from them to the balcony. Here, shoot at the target and then the statue of the archer suspended on ropes will fall down, breaking the boards that covered the pool. Jump into the water and pick up the bow from the arrow statue at the bottom, swim into the hatch, grab the elephant along the way (secret 11) and lower the lever. Now the small pool in the gym is full of water. Pop up and out of the gym. Now go to the garden, put a bow and arrow into the hands of the arrow. Turn the lever in front of him and pick up the item under the statue on the right. Return to the main hall of the manor and go up the stairs, go through the far door on the right side. In the corridor you will see a closed door, to the left of which insert the object found in the garden into the rectangle. Enter the room and you can listen to Lara playing the harp and piano. This ends the search for secrets in the house.